SAML-based Single Sign-On can be used only with POEditor organizations that have a paid plan.
To set up SAML-based SSO login for a POEditor organization using the Ping Identity identity provider, you can follow the steps in this article.
Get started by going to Organization Settings > Organization > Single Sign-On and entering the password for your personal POEditor account.
What you need to set up in Ping Identity
In the Ping Identity app, you will need to:
1) Create an app for POEditor. Navigate to Connections > Applications and click on the + icon at the top of the page to add an application.
You'll need to give the app a name and select SAML application for Application Type.
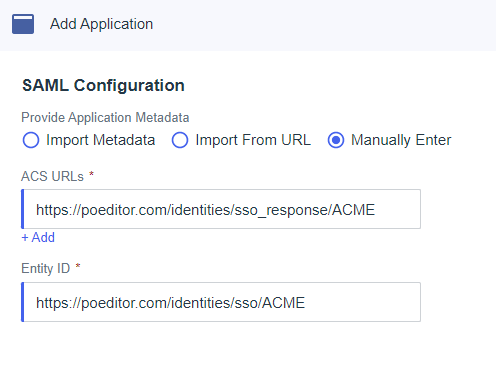
2) Configure SAML app. In the SAML Configuration section of your newly created SAML app, you will need to manually add the ACS URL and the Entity ID from POEditor. Below you can find a sample configuration.
3) Map the attributes in the SAML app In Attribute Mapping, you can match the Attributes from POEditor with the ones in PingIdenitity.
The POEditor localization platform has the following attribute mapping:
- email (for the user's email)
- firstName (for the user's first name)
- lastName (for the user's last name)
- userID (for the user's identifier)
- teams (for group names)
What you need to set up in POEditor
In POEditor, you will need to add:
1) a Default Team, which is the POEditor team where the users from your identity provider will be added, unless you already have them grouped in your IdP and send them as such to our platform, in which case each group will create a team in POEditor.
2) the SAML File Content, which you can copy from the Metadata file downloaded from Ping Identity.
Once everything is properly set up in both the POEditor localization platform and in the Ping Identity IdP, the users added to your IdP can login to POEditor using the Sign in URL.
You can restrict access to your organization's assets for users without SSO if you enable the Require SSO option in the Organization Settings.


