
Android provides a built-in localization system based on string resources. By defining user-facing text in XML files and organizing them by locale, Android can automatically load the correct translations at runtime based on the user’s language settings.
In most apps, this starts with <string> entries in strings.xml. However, for real-world use cases, you also have to deal with pluralized strings, values that shouldn’t be translated, and collections of strings defined as arrays.
This guide walks through localizing an Android application that includes standard <string> resources, pluralized strings using <plurals>, non-translatable values using translatable="false" and a string-array defined in a separate file and populated using references.
How Android handles localized string resources
Android handles localization through its resource system. Instead of switching languages in code, you provide multiple versions of the same resource, and Android selects the appropriate one at runtime based on the user’s language settings.
For strings, this is done using resource directories under res/values. Every Android project includes a default values directory:
res/
└─ values/
   └─ strings.xml
This file represents the app’s base language. If Android cannot find a localized version of a string for the current locale, it falls back to the value defined here.
Because of that, res/values/strings.xml should always be complete. Any string that may appear in the UI should exist in this file, even if translations are provided elsewhere.
Locale-specific string resources
To support additional languages, you add locale-specific values-* directories alongside the default one:
res/
├─ values/
│  └─ strings.xml
├─ values-es/
│  └─ strings.xml
└─ values-ar/
   └─ strings.xml
Each directory contains a translated version of strings.xml. The file name stays the same, but the folder name and the string values change.
When the app runs, Android checks the user’s preferred language and loads the matching resource set automatically. On Android 13 and later, users can also choose a language specifically for an app from system settings. This doesn’t change how resources are defined or resolved.
Improve your localization process
Discover an easy to use and affordable localization app.Create a new Android project
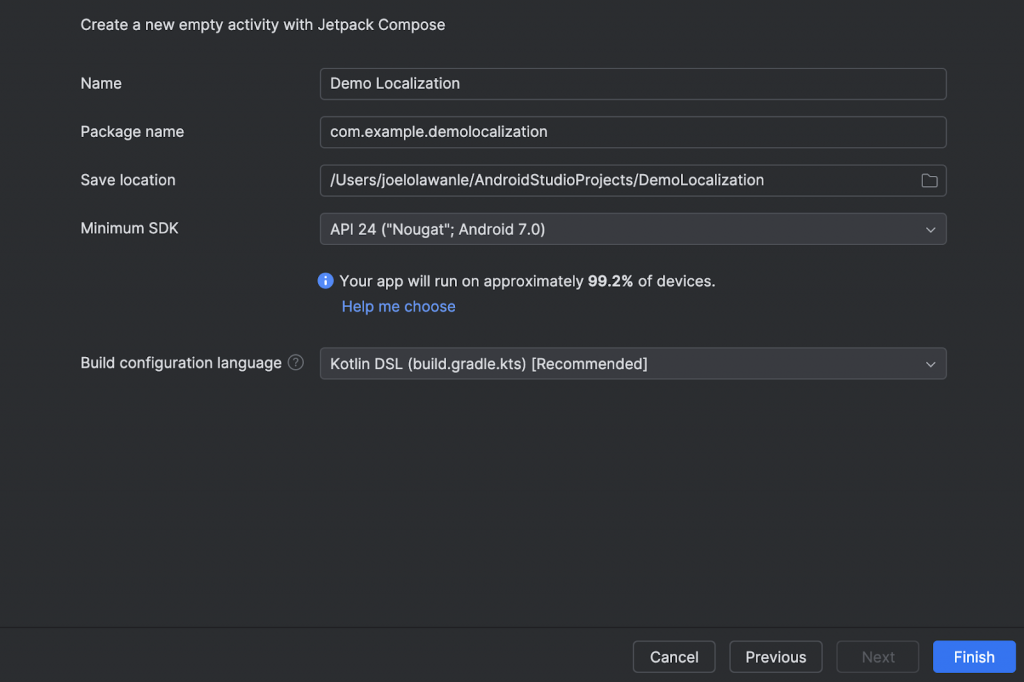
In Android Studio, create a new project with the Empty Activity template. Also select the Kotlin language and use minimum SDK of API 24 or higher. API 24 is sufficient for everything covered in this guide and avoids extra compatibility code that isn’t relevant to localization.
You can give your project any name and then click Finish.
Once the project is created, you should have a structure similar to this:
app/
└─ src/
   └─ main/
      ├─ java/ (or kotlin/)
      │  └─ MainActivity.kt
      └─ res/
         └─ values/
            └─ strings.xml
At this point, strings.xml will contain only a default app_name entry, and the UI will likely be showing placeholder text generated by the template.
Localizing standard string resources
With the basic UI in place, the first step toward localization is to move user-facing text out of the code and into string resources.
Android does not translate anything automatically. If a string is hardcoded in code or in a layout, Android has no way to replace it for different locales. To make a string localizable, it must live in a resource file.
Open res/values/strings.xml. You should see a file similar to this:
<resources>
<string name="app_name">Demo Localization</string>
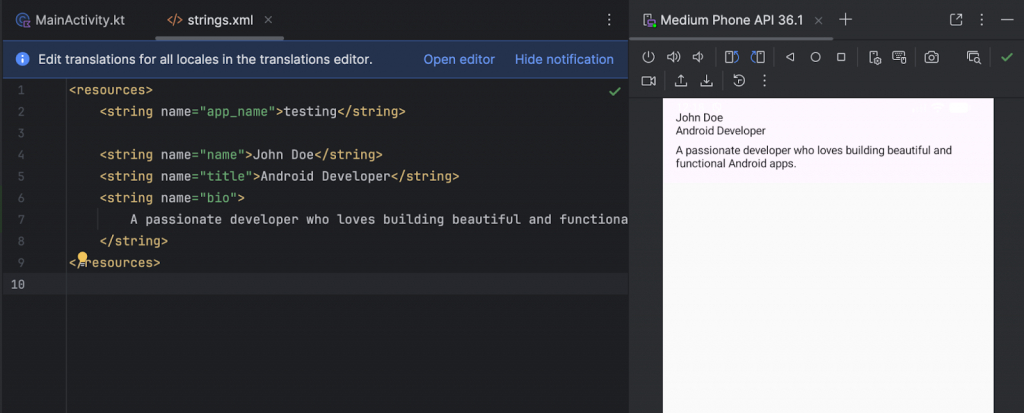
</resources>We’ll start by adding a few basic strings that will be displayed on screen. Update the file as follows:
<resources>
    <string name="app_name">Demo Localization</string>

    <string name="name">John Doe</string>
    <string name="title">Android Developer</string>
    <string name="bio">
        A passionate developer who loves building beautiful and functional Android apps.
    </string>
</resources>
Each string is defined using a unique name. These names are what you’ll reference from code. The actual text values are what will change per language.
Referencing string resources in code
Next, update MainActivity.kt to read strings from resources instead of hardcoding them. Replace the previous contents of MainActivity.kt with this:
package com.example.demolocalization

import android.os.Bundle
import androidx.activity.ComponentActivity
import androidx.activity.compose.setContent
import androidx.compose.foundation.layout.Column
import androidx.compose.foundation.layout.padding
import androidx.compose.material3.MaterialTheme
import androidx.compose.material3.Surface
import androidx.compose.material3.Text
import androidx.compose.ui.Modifier
import androidx.compose.ui.res.stringResource
import androidx.compose.ui.unit.dp

class MainActivity : ComponentActivity() {
    override fun onCreate(savedInstanceState: Bundle?) {
        super.onCreate(savedInstanceState)

        setContent {
            Surface(color = MaterialTheme.colorScheme.background) {
                Column(modifier = Modifier.padding(16.dp)) {
                    Text(text = stringResource(R.string.name))
                    Text(text = stringResource(R.string.title))
                    Text(
                        text = stringResource(R.string.bio),
                        modifier = Modifier.padding(top = 8.dp)
                    )
                }
            }
        }
    }
}
Note: The package name used in the code examples (com.example.demolocalization) will depend on how you created your project. If your package name is different, make sure the package declaration at the top of your Kotlin files matches your project’s namespace.
The key change here is the use of stringResource(...). This tells Compose to fetch the string value from Android’s resource system instead of using a literal value.
At runtime, Android resolves the string based on the current locale.
Adding a second language
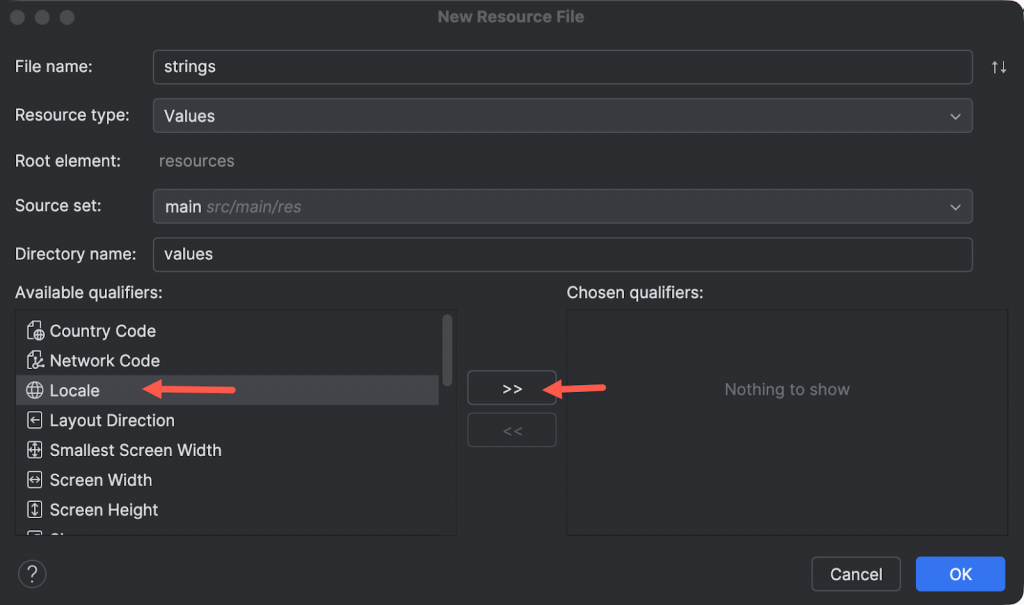
In your project, right-click the res folder and select New > Android Resource Directory. A modal appears, use strings as the file name, ensure the Resource type is set to values. Then for the Available qualifiers, click Locales and the arrow shown below:
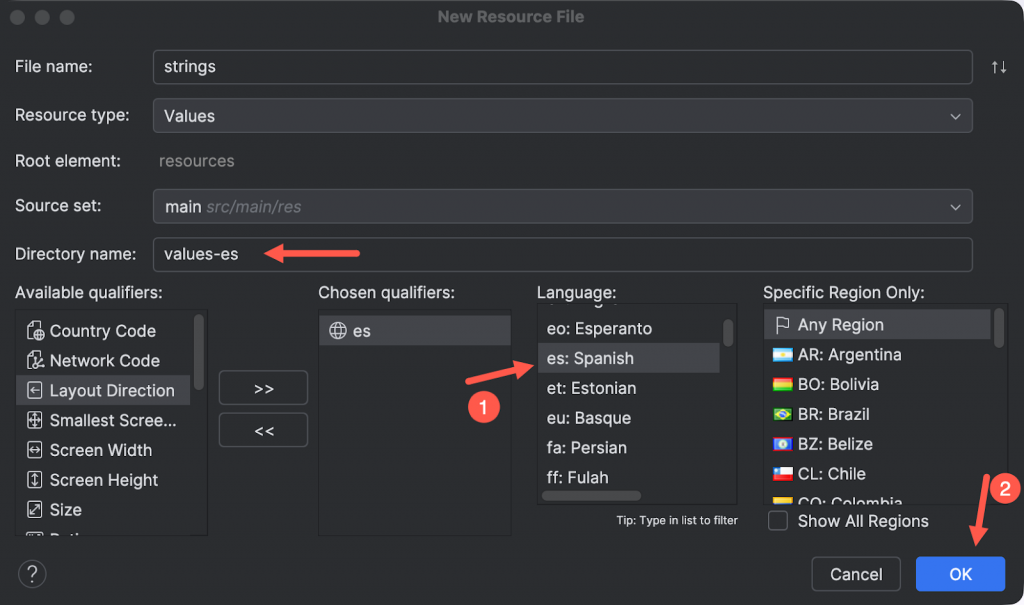
This loads up all languages and then you can select your preferred language, leave the region as Any Region and then click the OK button. You will notice that the Directory name changes to use values-*:
Note: Android Studio’s Android view groups locale-specific resource files together. Even though strings.xml (es) and strings.xml (ar) appear under the same values node, they are stored in separate values-es and values-ar directories on disk.
Inside the new strings.xml file, add the same string keys, but with translated values:
<resources>
    <string name="app_name">Demo Localization</string>

    <string name="name">Juan Pérez</string>
    <string name="title">Desarrollador de Android</string>
    <string name="bio">
        Un desarrollador apasionado al que le encanta crear aplicaciones de Android hermosas y funcionales.
    </string>
</resources>
The important rule here is that the string names must match exactly. Android uses the name to look up the value; the folder determines which language version is used.
Verifying the result
Run the app with the device or emulator language set to English and then to Spanish.
You should see the same UI, but with text changing automatically based on the selected language.
Handling plural strings with <plurals>
Simple string replacement isn’t enough when text depends on a number. Different languages have different grammatical rules for quantities, and handling that logic manually in code doesn’t scale.
Android solves this with plural resources, defined using the <plurals> element. This lets you define all grammatical variants of a string in one place and have Android select the correct one at runtime.
Open the default res/values/strings.xml file and add a plural definition for a project count:
<plurals name="project_count">
    <item quantity="one">%d project</item>
    <item quantity="other">%d projects</item>
</plurals>
Here project_count is the resource name, %d is a placeholder for the number, one and other are plural categories used by English.
Android follows CLDR plural rules under the hood, so the categories you define depend on the language.
Using plurals in Compose
To use this plural resource in code, update MainActivity.kt to include a numeric value and fetch the plural string using pluralStringResource().Update the content inside setContent as follows:
import androidx.compose.ui.res.pluralStringResource

val projectCount = 5

Text(
    text = pluralStringResource(
        id = R.plurals.project_count,
        count = projectCount,
        projectCount
    )
)
The count argument determines which plural form Android selects, while the final argument supplies the value for the %d placeholder.
Adding translations for plurals
Just like regular strings, plural resources must be translated per locale. Open res/values-es/strings.xml and add a Spanish version:
<plurals name="project_count">
    <item quantity="one">%d proyecto</item>
    <item quantity="other">%d proyectos</item>
</plurals>
The resource name stays the same. Only the values change.
Languages with complex plural rules
Some languages require more plural categories than English. Arabic, for example, defines categories such as zero, one, two, few, many, and other.
In res/values-ar/strings.xml, the same plural resource might look like this:
<plurals name="project_count">
    <item quantity="zero">لا مشاريع</item>
    <item quantity="one">مشروع واحد</item>
    <item quantity="two">مشروعان</item>
    <item quantity="few">%d مشاريع</item>
    <item quantity="many">%d مشروعًا</item>
    <item quantity="other">%d مشروع</item>
</plurals>
Android selects the correct form automatically based on the number and the current locale.
Using placeholders in localized strings
In addition to static text and plurals, Android string resources can also contain placeholders. Placeholders allow you to inject dynamic values into a localized string at runtime, while still keeping the full sentence translatable.
This is commonly used for greetings, labels that include user input, or messages that reference dynamic values such as names or titles. They are defined directly in strings.xml using standard formatting tokens, such as %s for strings.
In the default res/values/strings.xml, add the following entry:
<string name="greeting">Hello %s</string>Next, add translated versions in your locale-specific files. For Spanish (res/values-es/strings.xml):
<string name="greeting">Hola %s</string>The placeholder itself stays the same across languages. What changes is the surrounding text and, if needed, the position of the placeholder within the sentence.
To use a string with placeholders in Jetpack Compose, you pass the dynamic values directly to stringResource(). For example, to display a greeting that includes the user’s name:
Text(
    text = stringResource(
        R.string.greeting,
        stringResource(R.string.name)
    )
)
When you run the app and switch the device or emulator language. You should see the greeting update automatically, for example:
Excluding strings from translation
Not every string in an Android app should be translated. Brand names, company names, product identifiers, and certain technical terms are often meant to stay the same across all languages.
Android allows you to explicitly mark these values using the translatable="false" attribute:
<string name="brand_name" translatable="false">Acme Corp</string>This tells both Android and any localization tools that the string should be ignored during translation.
Using non-translatable strings in code
You reference non-translatable strings the same way as any other string resource. For example, in Compose:
Text(text = stringResource(R.string.brand_name))Note: Strings marked with translatable="false" should exist only in the default values directory. There’s no reason to duplicate them in locale-specific folders, and doing so can cause confusion in translation workflows. This pattern works well with localization platforms like POEditor. Since these tools usually import strings.xml, marking non-translatable strings explicitly prevents them from being flagged or accidentally translated.
Defining a string-array in a separate file
In addition to individual strings, Android also supports string arrays. These are useful when you need a fixed list of related values, such as menu options, labels, or system-defined items.
A string-array is defined using the <string-array> element and contains multiple <item> entries. By default, these arrays are often placed directly in strings.xml, but that you can also manage them separately, if the localization tool you’re working with does not support arrays.
There are multiple advantages to keeping all translatable text in strings.xml and referencing strings to string array items, including:
- decreased translation volumes: you do not need to translate the array items multiple times, should they occur multiple times
- improved translation consistency: using the same array item whenever it occurs in your app, you avoid translation discrepancies
In the res/values directory, create a new XML file (for example, string_array.xml) and add the following content:
<resources>
    <string-array name="system">
        <item>@string/item0</item>
        <item>@string/item1</item>
        <item>@string/item2</item>
    </string-array>
</resources>
Notice that the array does not contain any hardcoded text. Each item references a string defined elsewhere using @string/....
Next, open res/values/strings.xml and add the referenced strings:
<string name="item0">Item 0</string>
<string name="item1">Item 1</string>
<string name="item2">Item 2</string>
These strings now live alongside all other translatable content. To localize them, add the corresponding entries to your locale-specific files, for example in res/values-es/strings.xml.
Using the string array in a dropdown
So far, the string array is defined in a separate file and populated using references to strings defined in strings.xml. The next step is to verify that this setup works correctly in a real UI component.
A common use case for string arrays is a dropdown or selection menu. In Compose, we can populate a dropdown using the values returned by stringArrayResource().
First, read the array from resources:
import androidx.compose.ui.res.stringArrayResource

val systemItems = stringArrayResource(R.array.system)
Next, use those values in a simple dropdown component:
@Composable
fun SystemItemsDropdown() {
    val items = stringArrayResource(R.array.system)
    var expanded by remember { mutableStateOf(false) }
    var selectedItem by remember { mutableStateOf(items.first()) }

    ExposedDropdownMenuBox(
        expanded = expanded,
        onExpandedChange = { expanded = !expanded }
    ) {
        TextField(
            readOnly = true,
            value = selectedItem,
            onValueChange = {},
            label = { Text(stringResource(R.string.label_system_items)) },
            trailingIcon = {
                ExposedDropdownMenuDefaults.TrailingIcon(expanded = expanded)
            },
            modifier = Modifier.menuAnchor()
        )

        ExposedDropdownMenu(
            expanded = expanded,
            onDismissRequest = { expanded = false }
        ) {
            items.forEach { item ->
                DropdownMenuItem(
                    text = { Text(item) },
                    onClick = {
                        selectedItem = item
                        expanded = false
                    }
                )
            }
        }
    }
}
Finally, add the dropdown to your UI (for example, inside the main screen or card component):
SystemItemsDropdown()The dropdown now displays the values defined by the system string array:
Note: Because the dropdown uses a label (label_system_items), make sure to define it in the translation files.
Managing translations in POEditor
The setup we’ve built so far is intentional as all translatable strings live in strings.xml. That means strings.xml is the only file you need to send to POEditor to translate everything, including values used inside the array.
Instead of editing these files manually within your IDE, you upload them to POEditor, where you (or your team) can manage all the translations through a web interface.
To get started, create a project and add your app’s default language. From the Project page, use Import to upload your Android XML file (strings.xml).

Once translations are done, you export each language from POEditor and download the resulting Android XML.
You can do this manually through the dashboard, or automate it with the POEditor API. Here’s what an upload request looks like using curl:
url -X POST "https://api.poeditor.com/v2/projects/upload" \
  -F api_token="YOUR_API_TOKEN" \
  -F id="YOUR_PROJECT_ID" \
  -F language="en" \
  -F updating="terms_translations" \
  -F file=@app/src/main/res/values/strings.xml
This imports your translation keys and values into POEditor so you can start translating immediately. See the upload docs for everything you can tweak.
Once your translations are done, you can export updated files using their API too. For example, to download the Spanish version:
curl -X POST "https://api.poeditor.com/v2/projects/export" \
  -d api_token="YOUR_API_TOKEN" \
  -d id="YOUR_PROJECT_ID" \
  -d language="es" \
  -d type="android_strings"
The export response returns a downloadable file URL (that you then fetch and save as values-es/strings.xml).
Wrapping up
Android’s localization system is simple in principle, but the way string resources are structured makes a big difference once translations enter the picture.
By keeping all translatable text in strings.xml and using references from supporting resources like string_array.xml, you end up with a structure that is easier to reason about and works cleanly with localization tools such as POEditor.
This approach avoids duplicating translations, keeps resource files predictable, and makes it clear which files are part of the translation workflow and which are not. It also scales well as the number of supported languages grows, without requiring changes to application code.